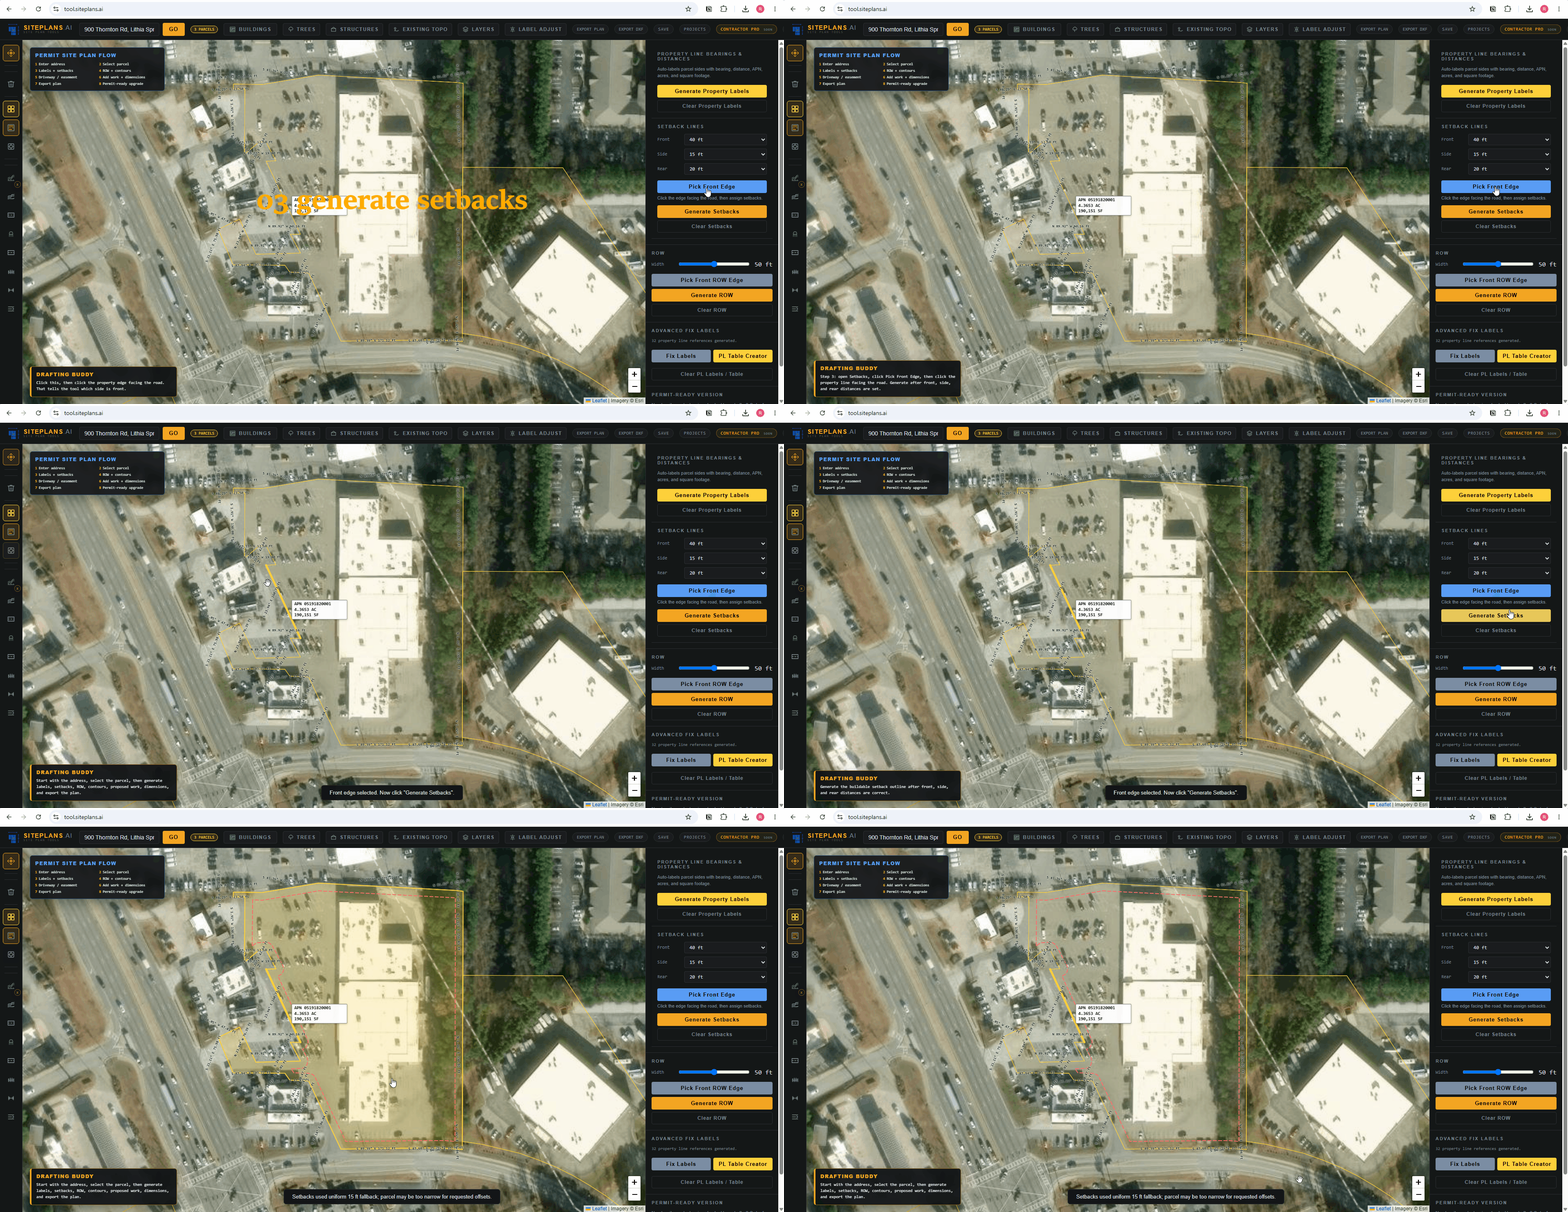
# How to Generate Setbacks in SitePlans.ai
Setbacks define how close you're allowed to build to your property line. Get this step right and the rest of your site plan falls into place. Get it wrong — specifically, misunderstand which direction setbacks are measured from — and you can end up with a plan that looks fine but wouldn't actually clear your city's requirements.
Quick Answer
Select your parcel, then pick the front property line (the one facing the street), and click Generate Setback. Default values appear — often something like 40 ft front, 25 ft side, 10 ft rear — which you can edit to match your city's actual requirements. You can also generate a right-of-way (ROW) line the same way, defaulting to 50 ft, adjustable to match the real edge of the road.
Step-by-Step: Generating Setbacks
1. Confirm your parcel is selected
If you haven't already, make sure your parcel is active. See how to select your parcel if you need to revisit that step.
2. Pick your front property line
Click Pick Front and select the property line that faces the road or street. This tells SitePlans.ai which direction is "front" for setback purposes — everything else (side and rear) is calculated relative to this.
3. Click Generate Setback
SitePlans.ai will draw setback lines using default values — commonly something like 40 ft front, 25 ft side, and 10 ft rear.
4. Edit the values to match your city
These defaults are a starting point, not your actual requirement. Every city sets its own numbers. Replace them with whatever your specific zoning district requires — for example, 15 ft front, 10 ft side, 5 ft rear. Check your city's zoning ordinance or building department if you're not sure what applies to your lot.
5. Check your setback lines against the aerial image
Once your setbacks are in place, look at the satellite/aerial image of the property underneath them. Confirm that any existing structures — your house, garage, or anything else already there — don't cross into the setback area. If something clips into it, that's worth knowing now, not after you've built your whole plan around it.
The Mistake Most Small GCs and Homeowners Make
Here's the one that trips people up constantly: setbacks are not measured from the building itself — not from the eave, and not from the footprint.
Setbacks are measured as a straight offset from the property line, inward. Picture the property line, then measure a fixed distance toward the interior of the lot — that line is your setback boundary. Whatever sits inside that boundary is where you're allowed to build. What actually happens to touch that boundary (a wall, an eave, a foundation edge) is a separate question your city's code answers — but the setback line itself always starts at the property line, not at any part of your structure.
Getting this backwards is one of the most common reasons a homeowner-prepared site plan gets flagged. If you're ever unsure, treat the setback line as coming from the property line and working inward — not from any point on your building.
Adding a Right-of-Way (ROW) Line
Many cities also want the right-of-way shown on your site plan — the boundary between your property and the publicly maintained road area.
1. Pick your front line again
Same line you used for the front setback — the one facing the road.
2. Click Generate ROW
This defaults to 50 ft, which matches typical ROW widths in a lot of U.S. cities.
3. Adjust the interval if needed
Change it from 50 to 40, 30, or whatever fits your situation.
4. Check it against the road edge
Look at the aerial image again. Your ROW line should line up with the actual edge of the road — the edge of the blacktop, asphalt, or paved surface. If it doesn't match visually, adjust the interval until it does.
Once generated, your ROW line will show up labeled — for example, "ROW 50 ft" — right on your plan.
What to Check Before Moving On
- Front property line is correctly picked (the one facing the street)
- Setback values match your actual city requirements, not just the defaults
- Setback lines don't unexpectedly overlap existing structures shown in the aerial image
- ROW line is generated and visually lines up with the real edge of the road
- ROW label displays the correct distance
Common Mistakes
Leaving the default setback values in place. The defaults are just a starting point. Always replace them with your city's actual numbers.
Measuring from the building instead of the property line. Setbacks start at the property line and work inward — never from your eave, wall, or foundation edge.
Skipping the aerial image check. It only takes a few seconds to visually confirm nothing collides with your setback lines, and it catches problems early.
Guessing at the ROW width. 50 ft is common, but not universal. Check it against the visible road edge in the aerial image rather than assuming the default is correct for your street.
If Something Isn't Working
Setback lines look wrong or didn't generate — Confirm you picked the correct front property line first; setbacks are calculated relative to that selection.
ROW line doesn't match the road — Adjust the interval manually until it visually lines up with the paved edge in the aerial image. Not every city uses 50 ft.
Aerial image doesn't show clearly enough to check for collisions — Zoom in for a closer look before finalizing your layout.
Not sure what your city's actual setback numbers are — Check your city or county zoning ordinance directly, or contact your local building department before finalizing your plan.
When to Get Help
Reach out to SitePlans.ai support or use the done-for-you option from SitePlans.us if:
- You're not sure which setback numbers apply to your zoning district
- Your existing structures appear to conflict with generated setback lines
- Your city has unusual or non-standard ROW requirements
- Your permit was already rejected over a setback issue
- You'd rather have a professional verify the plan before you submit
What's Next
With your setbacks and ROW in place, you're ready to start adding your actual project — fence, shed, deck, pool, or whatever you're building — on top of a plan that already reflects your property's real boundaries and required distances.
Related SitePlans.ai Features
FAQ
What direction should I pick as the "front" property line?
The line facing the road or street your property fronts on. This is what SitePlans.ai uses to calculate front, side, and rear setbacks.
What are the default setback values?
Commonly around 40 ft front, 25 ft side, and 10 ft rear — but these are just starting defaults. Always replace them with your specific city's actual requirements.
Are setbacks measured from my house or from the property line?
From the property line, always. Setbacks are an inward offset from the boundary line — not a measurement taken from your building's eave, wall, or footprint. This is one of the most common misunderstandings on homeowner-prepared site plans.
How do I know if my structure conflicts with a setback?
After generating your setback lines, look at the aerial/satellite image layer under your plan. If any existing structure crosses into the setback area, that's worth addressing before you move forward.
What's the ROW line for?
It marks the right-of-way — the boundary between your private property and the publicly maintained road area. Many cities want this shown on a site plan alongside your setbacks.
Why is the ROW default set to 50 ft?
That's a common right-of-way width across many U.S. cities, but it's not universal. Check it against the actual road edge in your aerial image and adjust if needed.
How do I adjust the ROW interval?
Generate it from your front property line, then change the value from 50 to whatever fits — 40, 30, or another figure that matches the visible edge of the road.
What if my city's setback rules are unusual or hard to find?
Check your local zoning ordinance directly, or contact your building department. If you're still unsure once you have the numbers, SitePlans.us can review the full plan for you.
Start Here
Already picked your front line? Generate your setbacks and ROW, then move on to adding your project.
Not sure your setback numbers are right, or already got flagged by your city?