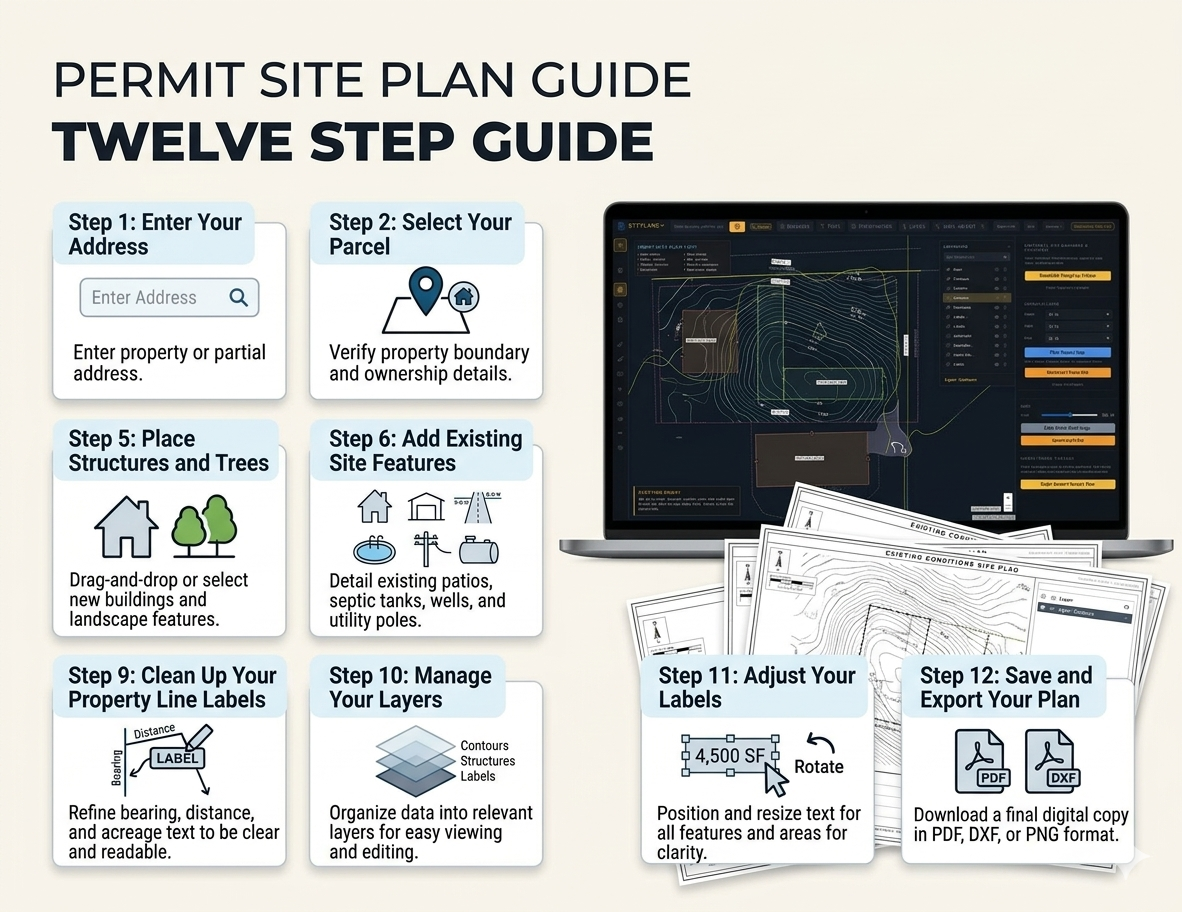
# How to Make a Site Plan Online with SitePlans.ai: A 12-Step Guide
If you've ever needed a site plan for a permit — a fence, a shed, a deck, a pool, anything — you already know the usual options aren't great. You either learn CAD software you'll use twice a year, or you wait two or three weeks for a drafter to fit you into their schedule.
SitePlans.ai was built to skip both of those. You start with your address, and from there it's a series of simple clicks, drags, and adjustments until you have a clean, professional-looking site plan ready to export. Most people finish in about 10 minutes.
This guide walks through all 12 steps. A quick note before you start: SitePlans.ai uses color-coded buttons throughout the tool — blue, green, yellow, red — to help you recognize what does what as you go. We'll call those colors out as we go so nothing catches you off guard.
Check My Address Create My Site Plan
Step 1: Enter Your Address
Start by typing your property address into the search bar at siteplans maker Use the full, standard format: house number, street, city, county, state, and postal code.
Here's a trick worth knowing: not every address is formatted the way you'd assume. If you're not sure your address will be recognized correctly, type it into Google Maps first. If it shows up correctly on the aerial view there, it'll almost always work the same way in SitePlans.ai. It sounds like an extra step, but it saves you a few minutes of guessing later.
Before you touch the tool, do these three things:
- Sign up first. Don't try to use the webtool without an account — you'll lose your work the moment you close the tab.
- Check your coverage area. SitePlans.ai is expanding constantly, but not every city has the same quality of property data yet. Check the coverage page before you get started. If your city isn't fully covered, leave us feedback — tell us what you're building and where (something like "I'm creating a site plan for a pool in Nashville and the address isn't showing up yet") and our team will follow up once your area is supported.
- Watch the walkthrough video. There's a full 10-minute video on the support page that shows the entire workflow start to finish. If this is your first time, watch it once — it'll save you more time than it costs.
Once you've done that, type your address into the search bar and let the tool find your property.
Step 2: Select Your Parcel
The moment your address loads, your parcel is automatically pulled and selected — along with the two adjoining parcels on either side of yours.
At the same time, your property line labels appear automatically. These are the bearings and distances of every property line, pulled straight from your county's parcel records. You'll see something like `43°23'34" — 234.54 ft` on each line — that's the direction and the length, measured corner to corner, right down to the iron pin marker at each corner.
One honest caveat here: county parcel data is only as good as the county's own records. Sometimes it's precise down to the inch. Sometimes it's a little rougher. For most small residential permits — a fence, a shed, a deck — you don't need an expensive licensed survey, and SitePlans.ai gives you what you need. But always confirm with your city's building department whether your specific project requires a sealed survey instead of a preliminary site plan.
Once your parcel is selected, that's officially your lot for the rest of the plan. From here, it's just a handful of clicks to a finished site plan.
Step 3: Generate Setbacks and Right-of-Way
With your parcel selected, click the blue Pick Front button, then head into the drawing area to select the front property line — the one facing the road.
Here's the trick to picking it correctly: look at the aerial image and find the road. As you move your cursor toward that front line, just slightly outside the property boundary, your cursor will change into a plus symbol. That's your signal — click right there, and the front line will highlight.
Now go to the right-side panel and click Generate Setbacks. You'll get default values you can edit — say, 20 ft front, 10 ft side, 5 ft rear — and you should adjust these to match whatever your city actually requires.
A quick tip that saves people a redo: look at your house or building outline once the setback lines appear. If the dashed red setback line is cutting into the edge of your building, that's a sign your setback values are too large — bring them down until the lines make sense against what's actually built on the lot.
While you're at it, you can generate your right-of-way (ROW) the same way. Pick the front line, click Generate ROW, and adjust the default 50 ft interval down to 40 or 30 if needed — just check it against the actual paved edge of the road in the aerial image until it lines up.
Step 4: Generate Contours and Building Lines
This is one of the easier steps. Click the contour icon in the left-side toolbox, then hit the green Generate Contours button. By default, you'll get 1 ft minor and 5 ft major contour intervals — which happens to be the standard most cities expect on a residential site plan.
Once contours are in, look at the elevation labels running across your property. These give you a rough sense of drainage and slope — useful for figuring out where to place a new structure so it isn't fighting the natural grade of the lot.
Next, generate your building outline. Select the building feature from the top-left panel, and click the red Generate button — sometimes it takes a couple of clicks to fully populate. Once your building lines appear in red, close that tool panel and move on.
Step 5: Place Structures and Trees
Now for the part you actually came here for — placing your project. Go to the top toolbar and select Structures. You'll find presets for fences, decks, patios, workshops, and pools — including pool shapes like Roman, lap, plunge, and rectangular.
After placing a structure, click the small dot on its corner and drag it outward or inward to resize it. Use the right-side panel to rotate it into the correct orientation.
Trees work the same way — pick, place, resize, rotate.
One habit worth building early: always place a new structure just outside your lot line first, then drag it into position. It's easier to line things up that way than trying to drop it exactly right on the first try. If you need to start over, use Clear Tree or Clear Structure from the right panel.
Step 6: Add Existing Site Features
From the top-right bar, open Existing Topo. This gives you symbols for things already on your property — manholes, storm drains, electric meters, utility poles, septic lids, water meters. Since you know your own property, this step is mostly just placing the right symbol in the right spot and adjusting its position.
Step 7: Draw the Driveway
This is one of the simplest tools in the whole workflow. From the left toolbox, click Ingress Egress Easement.
Click your starting point — usually where the driveway enters your property — then trace the shape of the driveway using the satellite image as your guide, clicking again where it ends. Once it's drawn, use the green dots to fine-tune the shape so it matches what's actually on the ground, and the grey dots to adjust the overall size. You can also fine-tune the size manually with the slider in the right panel.
Step 8: Draw the Fence
Select Fence Line from the left toolbox. Click your starting point, add turns as needed, and click again wherever the fence ends. The length label appears automatically as you go.
Head to the right panel to set the fence height, and add notes on material or type if your permit application asks for it.
Step 9: Clean Up Your Property Line Labels
This is one of the more useful tools in the whole tool, especially on lots with a lot of corners.
If your lot has several property lines close together, the automatically generated bearing and distance labels can get cluttered — you'll end up with more labels than you actually need. There are two ways to fix this, and which one you use depends on your lot.
Option one: Fix Labels. Select the grey Fix Labels button, then click each property corner one at a time, starting from any corner and working your way around the outside edge of the lot — not the inside. A notification will prompt you toward the next corner each time. Finish back at your starting corner, and the extra, cluttered labels along the same line will collapse down into a single clean label. Use this option when you have multiple points along essentially the same direction and want to simplify them. There's a full walkthrough of this specific tool in our label cleanup guide.
Option two: PL Table Creator. For corner lots or irregular shapes with a lot of property lines, click the yellow PL Table Creator button instead. This turns every bearing and distance label into a simple reference — L1, L2, and so on — and generates a clean table automatically placed in your title block sheet. This is what keeps a complex lot's site plan looking organized instead of cluttered with overlapping text. It's also one of the small things that separates a real permit-style site plan from a lot of the free drawing tools out there — most of them don't generate a title block at all, and a missing title block is a common reason a plan reviewer flags a submission.
Step 10: Manage Your Layers
Next to the main toolbar, click Layers. This lets you toggle what's visible on your plan without deleting anything — turn off contours while you focus on structures, for example, then turn them back on later. Nothing you turn off is lost; it's just hidden until you need it again.
Step 11: Adjust Your Labels
This is another one of those small features that makes a real difference in how professional your final plan looks. Next to the Layers button, click Label Adjust, then turn on the yellow toggle in the dropdown.
With this on, every label on your plan becomes fully adjustable — you can drag it into a better position, resize it for readability, or rotate it to match the direction of the line it's labeling. It's a small step, but it's the difference between a plan that looks hand-drawn and one that looks like it came off a professional's desk.
Step 12: Save and Export Your Plan
Before anything else — save your project. You've put real time into this, and there's no reason to risk losing it. Once it's saved, you can reload it anytime from your dashboard, whether that's five minutes from now or after a coffee break.
When you're ready to finish, click Export. You'll see your full title block sheet — designed to look like a genuine surveyor's sheet, with your property data already filled in and every field still editable. Add your name, your company name, or any project notes you want included.
From the top-left corner, click Move to reposition your property line table and vicinity map wherever the layout looks cleanest. Then click the PDF button to save your file — formatted for A3 landscape printing, so it prints clean and readable at full size.
That's it. You've built a permit-style site plan yourself, without waiting on anyone else's calendar.
A Few Things Worth Knowing
SitePlans.ai gets you a clean, preliminary site plan fast — but it's worth being upfront about what it is and isn't. It's not a licensed boundary survey, and it doesn't provide a sealed engineer's, architect's, or surveyor's stamp. County parcel data is generally solid but isn't a substitute for a legal survey where one is actually required. If your city calls for a sealed plan, a floodplain study, or an engineer's review, that requirement doesn't go away just because your draft looks clean — you'll still need to bring in a licensed professional for that piece.
For the vast majority of small residential permits — fences, sheds, decks, driveways, small additions — this is exactly the tool built for the job.
FAQ
How long does it actually take to make a site plan?
Most people finish in about 10 minutes once they know the workflow. It usually takes longer only if you skip signing up first, skip checking your coverage area, or skip the walkthrough video.
Do I need to know CAD or drafting software?
No. Every step in SitePlans.ai is click, drag, and adjust with your mouse. There's no drafting software to learn.
What if my address doesn't show up?
Check it in Google Maps first — if it displays correctly there, it should work the same way in the tool. If it still doesn't load, check your coverage area and leave us feedback with your city and project type so our team can follow up.
How accurate are the property lines?
They're pulled from your county's parcel records, which vary in precision by county. For most small permits, this is enough. If your project needs a legal survey, your city's building department will tell you — SitePlans.ai doesn't replace that requirement where it applies.
What's the difference between Fix Labels and PL Table Creator?
Fix Labels cleans up multiple labels along the same direction into one clean label. PL Table Creator is better for corner lots or irregular shapes — it converts all your bearings and distances into a simple table (L1, L2, etc.) placed neatly in your title block.
Can I edit the site plan after I export it?
Yes — reload your saved project anytime from your dashboard and make changes before exporting again.
Does SitePlans.ai replace a licensed surveyor?
No. It's built for preliminary, permit-style site plans. If your city requires a sealed survey or an engineer's stamp for your specific project, you'll still need to get that separately.
What if my setback lines cross into my existing building?
That's a sign your setback values are too large for what's actually built on the lot. Reduce the values until the dashed setback line clears your building outline, and double-check the correct numbers with your city.
Start Building Your Site Plan
Stop waiting on someone else's calendar. Create your first site plan yourself, in about 10 minutes.